As with all things, the more you use your vehicle, the more things start to wear out or go out of adjustment.The key to maintaining proper operation of your Nissan X-trail, even in the face of these, is regular maintenance. A knowledgeable and experienced automobile technician can often determine the condition of your vehicle, and the appropriate measures to take, in less than half an hour.
One common issue that is overlooked, especially on vehicles equipped with an automatic transmission, is the parking brake. After all, putting your vehicle in “Park” (1st or Reverse on manual transmission) is typically enough to keep the car from moving, so many people forget to engage the parking brake. Make sure you are in the practice of using the parking brake every time you park your Nissan X-Trail, and be sure to release it every time you move again. This will help to keep the cables from freezing up.
Of course, using your Nissan X-Trail’s parking brake will stretch the cables, especially when new, and will wear the parking brake shoes. This stretch and wear is minimal, and you may never have to actually replace parking brake shoes, at least for the first 150,000 km, some for at least 300,000 km. During that time, the cable and brake shoes will most likely require adjustment to keep them functioning properly. When the vehicle was new, the parking brake, also referred to as “hand-brake,” “foot-brake,” or “emergency-brake,” just two or three clicks may have been sufficient to keep it from moving.
Over time and use, however, cable-stretch and shoe-wear may render the parking brake useless, even if you pull it to the limit. You could include a brake cleaning and adjustment in your regular maintenance when you bring it to the shop. On the other hand, if you have the proper tools and are mechanically-inclined, you can do it yourself.
How To Adjust Your Parking Brake
Now, some DIY guys and even inexperienced mechanics make the mistake of adjusting the end of the cable at the parking-brake handle. It’s a quick and dirty fix, but it really only creates further problems. Do not adjust the cable. When the parking brake is not engaged, there should be absolutely no tension on the cable. Adjusting the cable may bring back brake function, but it will stretch the cable again. Here, we’re going to give you the proper method to adjust the parking brake on your Nissan X-Trail.
1. First, you’ll need a level place to work on, since we’ll have to leave the vehicle in neutral to work on the parking brake. Chock both front wheels to keep the vehicle from moving, make sure the parking brake is disengaged, and leave the transmission in Neutral.
2. Jack up the rear of the vehicle until the rear wheels are off the ground a few centimeters. Place jack stands under the frame of the vehicle to support it, and lower the jack until the vehicle is resting on the stands.
3. Never go under a vehicle supported solely by the jack.
4. At this point, you should be able to spin the rear wheels freely. Behind each rear wheel is a brake assembly. There are actually two sets of brakes. The hydraulic brakes act on the brake calipers on the outer rim of the brake disc, which is shaped like a hat. The brim of the hat is the disc brake, which we’re not going to touch. The inside of the hat is where the parking brake works, and it’s a breeze to adjust.
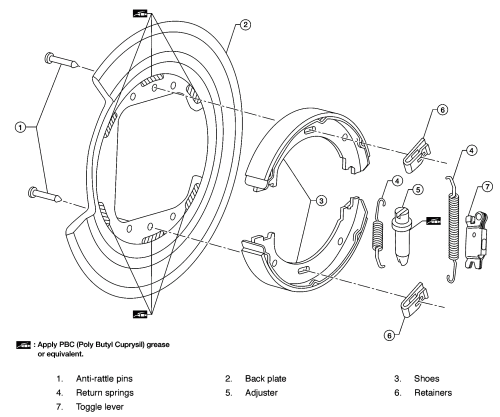
5. Taking a look at the diagram, you can see the adjuster, No.5, which is located at the same side as the brake caliper. You should be able to see it with a flashlight. If there is a lot of brake dust, as is common, use a liberal amount of brake cleaner spray to clean it up, spinning the wheel to get the brake cleaner into the whole drum.

6. Use safety glasses, a dust mask, and nitrile rubber gloves, to protect yourself from the brake dust and cleaner.
7. You’ll note the parking brake adjuster has a toothed wheel, which you can use a small screwdriver or brake-adjusting tool to turn. You’ll have to figure out which way to turn the adjuster until you can no longer turn the wheel. Then, back off the adjuster until you can turn the wheel a little bit. Go inside the vehicle, pull the parking brake, and then release it.
8. Check to see if you can spin the wheel without any resistance from the brake. You should be able to hear if the brake is rubbing. If so, back off the adjuster another notch (the adjuster teeth rub on a spring), engage and disengage the parking brake again, and make sure the brake isn’t rubbing.
9. It may take a few tries to get the adjustment right, so that the wheels spin without dragging on the brake. If the brakes drag, they will heat up the drum and wear out the shoes, both of which cause problems with overheating and dust. If the parking brake is too loose, then it won’t work when you need it to. Generally speaking, the hand brake should be pretty solid if you pull it two or three clicks, but no more than four or five.
10. Once you drop the vehicle back on the ground, take it for a test drive. Walk around the vehicle to check for burning, which would indicate brake dragging. At low speed, engage the parking brake to stop the vehicle, maybe once or twice, but no more. Find a hill to park on and fully engage the brake to park the vehicle. Three or four clicks on the parking brake should be sufficient to hold the vehicle, even if it’s not in “Park” or in gear.
Given that this is such a simple adjustment that often goes overlooked, it’s probably a good idea to do this right now, before you have a need for the emergency function of the brake. If the handle doesn’t move very well, chances are that the cables have seized. Don’t force it, as you might immobilize your vehicle by locking up the parking brake.
Following these DIY steps, with the proper tools, and keeping safety in mind, you can probably do this the second time in about 15 minutes. You’ll also save yourself a trip to the garage and the bill that goes with it!


Copy and paste
And how does this article affect those of us who don’t own xtrails. Then again, Everyone who owns this car should have manuals and much interest to learn more on their own. If it’s for purposes of expansion at LT, a section of motor/car news should be introduced.
Thank you very much. i appreciate it.
This description is much easier then the manual. The X-trail is notorious for having a bad park brake, keeping it well adjusted is the only way to prevent those problems. thank you for a very useful post.
Thank you I have just changed all the disks and pads on my 59 reg xt just the adjustment to do now ,would realy like a manual for this motor cant find one ,Haynes don’t do one . Thanks for info anyway from george simpson County Durham